This is a utility that manages LLM tool calls and creates a graph for your agent flows:
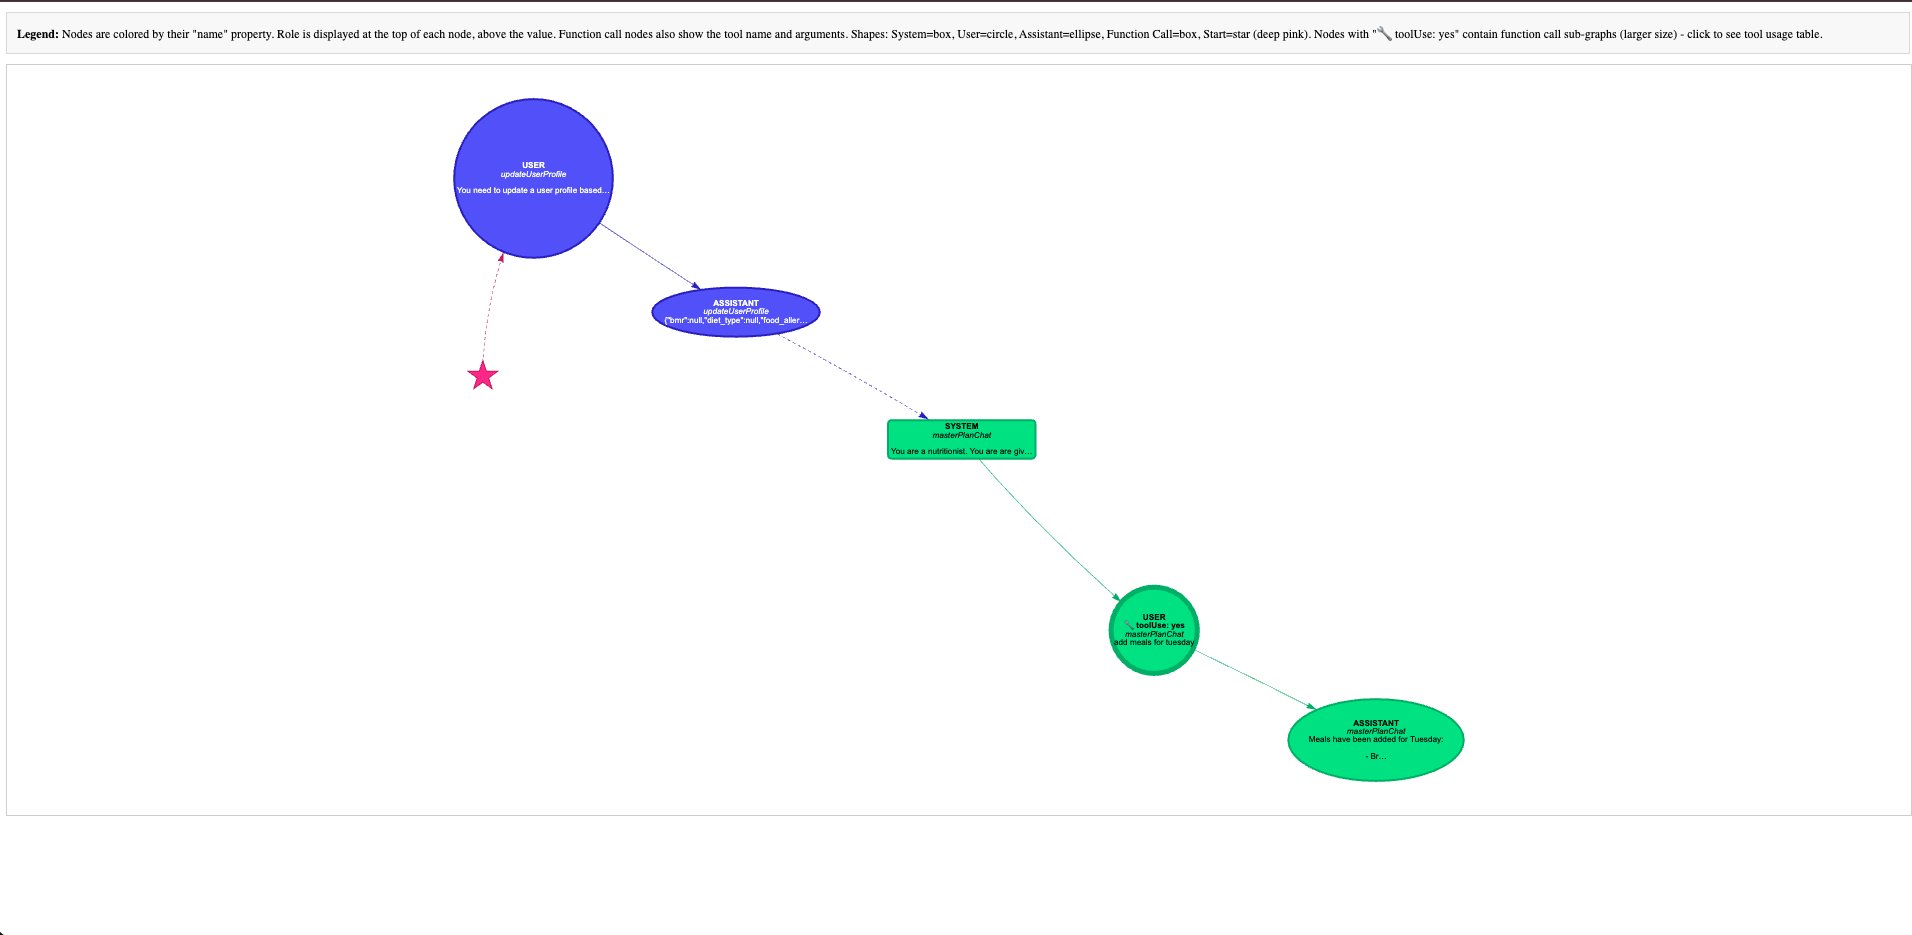
- Each node in the graph is one message in a conversation with an LLM (ex: system message -> user message -> assistant message)
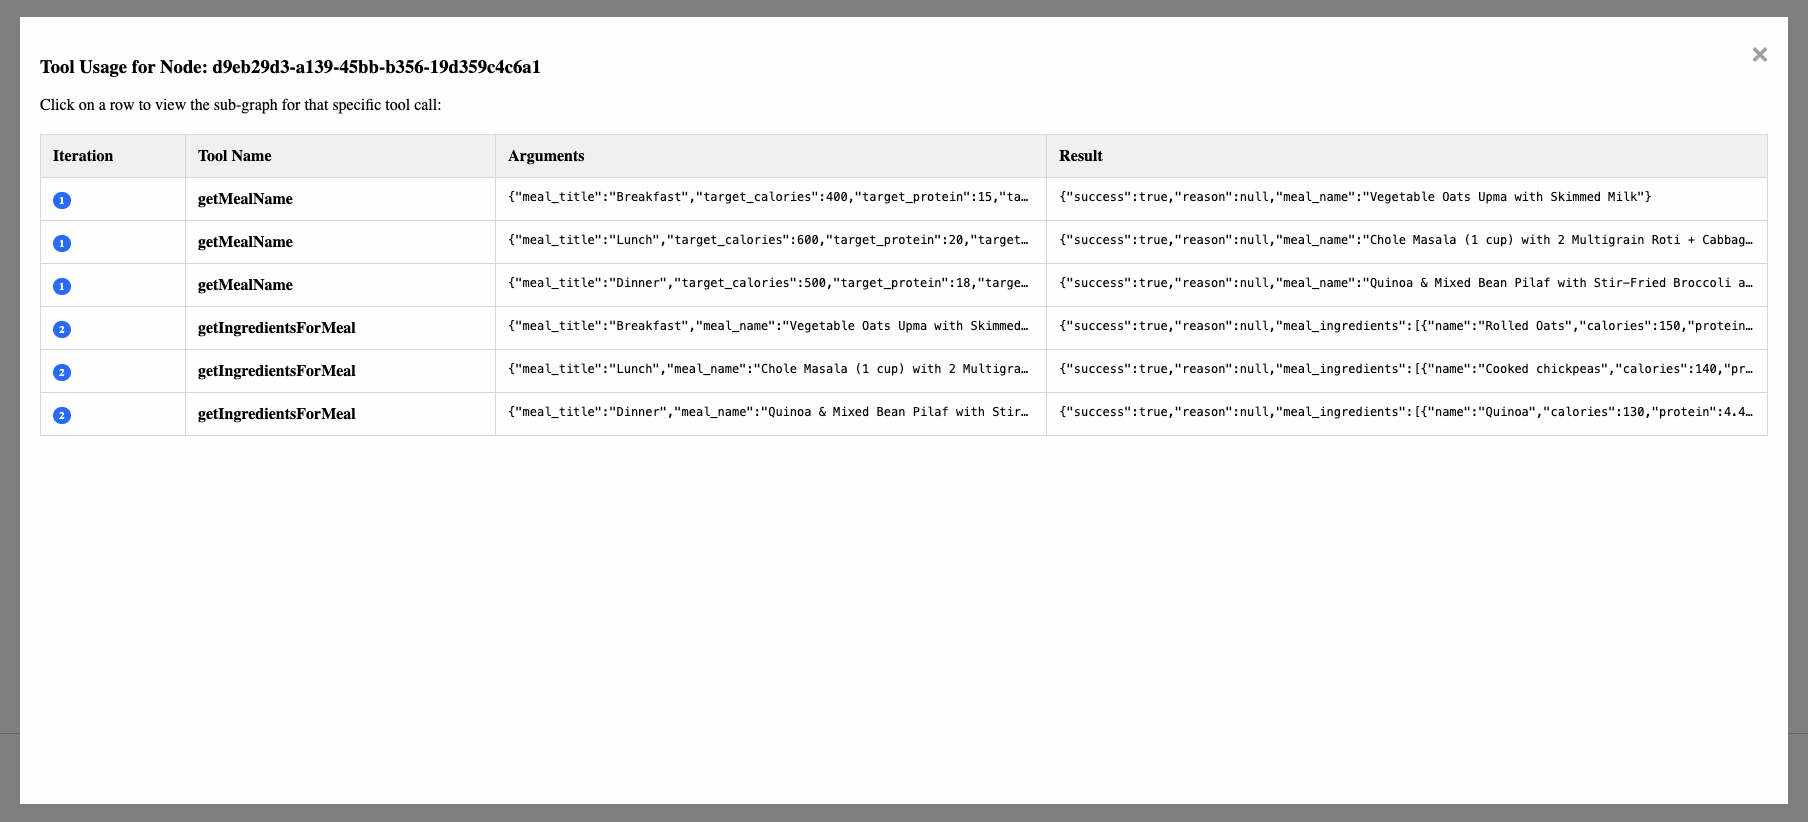
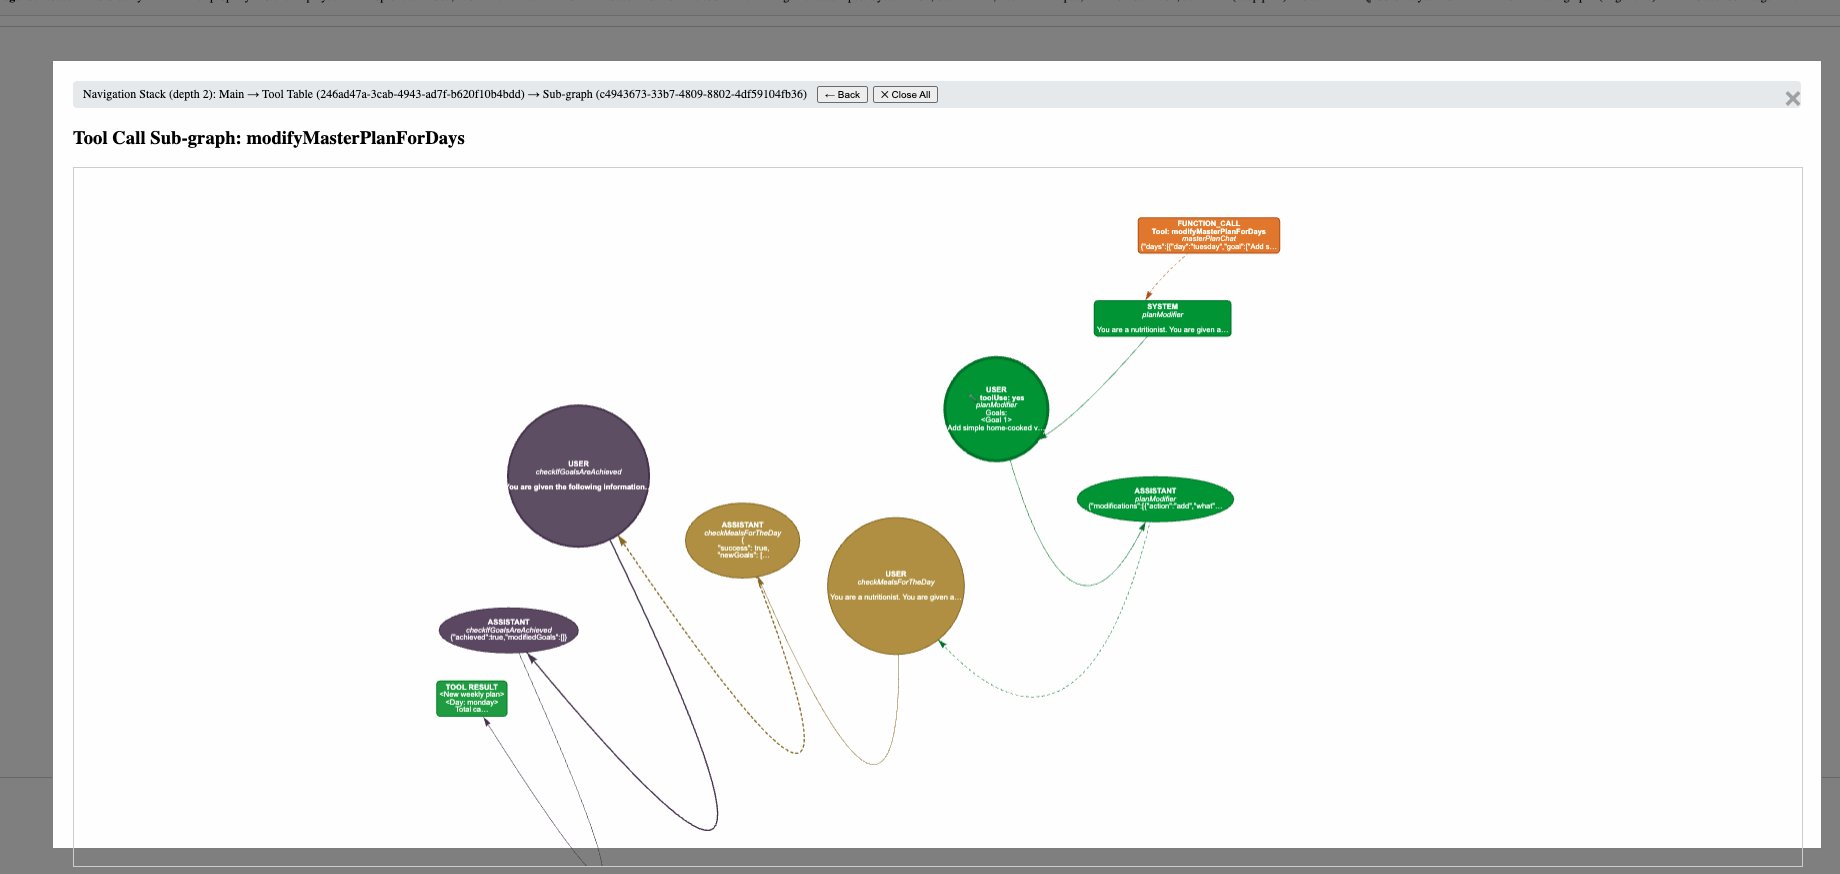
- A node can have a sub graph if the LLM used tool calling in that turn. You can click on the node to view the list of tools called, their inputs and outputs, and visualize the tool call's sub graphs.
- You need to integrate our SDK into your backend code, and wrap LLM calls with our wrapper function. This wrapper function will do tool calling, capture the LLM interactions, and store it in a folder that you specify, as a json file.
- Each file can span just one LLM call (and its tool calls), or span across multiple LLM calls (and their tool calls). This is controlled by a
sessionIdstring that you specify as part of the input to the wrapper function. - You can then visualize the graph for a json file by running the visualizer present in this repo.
Below are the steps on how to integrate our SDK into your code, and visualize the graph.
Install the package using npm:
npm install --save @trythisapp/agentgraphAdd these environment variables to your .env file:
AGENT_GRAPH_OUTPUT_DIR=./agentgraph_output
AGENT_GRAPH_SAVE_OUTPUT_TO_DIR=true
AGENT_GRAPH_OUTPUT_DIR: The directory to save the output json files of the llm calls.AGENT_GRAPH_SAVE_OUTPUT_TO_DIR: Whether to save the output json files of the llm calls or not to a directory.
IMPORTANT: We recommend that you set AGENT_GRAPH_SAVE_OUTPUT_TO_DIR to true only in a development environment, and set it to false in a production environment. This is because we do not want to save output JSON files in the file system in production. Instead, for production use cases, pass a callback to the callLLMWithToolHandling function, and save the output JSON files to your database (will be shown below).
import { v4 } from 'uuid';
import OpenAI from "openai";
import { callLLMWithToolHandling, clearSessionId } from "@trythisapp/agentgraph";

let openaiClient = new OpenAI({
    apiKey: process.env['OPENAI_API_KEY'],
});

const agentName = "my-agent"
const sessionId = v4(); // or it can be any other ID
try {
    let input: OpenAI.Responses.ResponseInput = [{role: "user", content: "Hello, how are you?"}];

    let response = await callLLMWithToolHandling(agentName, sessionId, undefined, async (inp) => {
        return await openaiClient.responses.create({
            model: "gpt-4.1",
            input: inp,
        });
    }, input, []);

    console.log(response.output_text)
} finally {
    // this frees up the resources used by the sessionId
    clearSessionId(sessionId);
}- In the above, we can see how we have wrapped a simple OpenAI call with
callLLMWithToolHandling(the wrapper function) from our SDK. We pass in a uniquesessionIdthat's unique for this instance of the LLM call. The JSON file that is generated will be this${sessionId}.json. - In this case, since there is no tool calling, the wrapper function will just capture the user message and the assistant reply, i.e. there will be only 2 nodes in the graph.
- You can also add a system message in the input, in which case, there will be 3 nodes in the graph.
- The final call to
clearSessionIdis important. It frees up the resources used by the sessionId. The JSON output file that's generated from the LLM call is not affected by this.
In this section, we will see how to add a simple tool call. The tool call implementation is not using an LLM.
import { v4 } from 'uuid';
import OpenAI from "openai";
import * as math from 'mathjs';
import { callLLMWithToolHandling, clearSessionId } from "@trythisapp/agentgraph";
import { ResponseFunctionToolCall } from "openai/resources/responses/responses";

let openaiClient = new OpenAI({
    apiKey: process.env['OPENAI_API_KEY'],
});

const agentName = "my-agent"
const sessionId = v4(); // or it can be any other ID
try {
    let input: OpenAI.Responses.ResponseInput = [
        {role: "system", content: "You are a helpful assistant that can do math. Use the doMath tool if needed."},
        {role: "user", content: "What is 21341*42422?"}
    ];

    let response = await callLLMWithToolHandling(agentName, sessionId, undefined, async (inp) => {
        return await openaiClient.responses.create({
            model: "gpt-4.1",
            input: inp,
            tools: [{
                type: "function",
                strict: true,
                name: "doMath",
                description: "Use this tool when you need to do math (for things like calculating total or average calories etc). Example expressions: " + "'5.6 * (5 + 10.5)', '7.86 cm to inch', 'cos(80 deg) ^ 4'.",
                parameters: {
                    type: 'object',
                    properties: {
                        expression: {
                            type: 'string',
                            description: 'The mathematical expression to evaluate.',
                        },
                    },
                    required: ['expression'],
                    additionalProperties: false
                },
            }]
        });
    }, input, [{
        toolName: "doMath",
        impl: async ({ expression }: { expression: string }) => {
            let response = math.evaluate(expression);
            if (typeof response === "string") {
                return response;
            } else if (typeof response === "number") {
                return response.toString();
            } else {
                return JSON.stringify(response);
            }
        },
        convertErrorToString: (err: any) => {
            // In case the impl function throws an error, this function is called to convert the error to a string. You can return any string here, or just rethrow the error.
            // It is passed to the LLM as the response from the tool call.
            return err.message;
        },
        shouldExecuteInParallel: (input: { toolName: string; toolArgs: string; toolCallId: string; allToolCalls: ResponseFunctionToolCall[] }) => {
            // if there are multiple tool calls, this controls if we should run them in parallel or not. You can
            // return true / false dynamically based on the input and if the tools you create depend on each other or not (if they have shared
            // memory for example, then you may not want to run them in parallel).
            return true;
        },
    }]);

    console.log(response.output_text)
} finally {
    // this frees up the resources used by the sessionId
    clearSessionId(sessionId);
}-
In this case, we have added a tool for the LLM to do math:
- We tell the LLM about the tool in the system prompt (you can also do this in the user prompt).
- We tell the OpenAI SDK about the tool in the
toolsparameter. We describe the input. - We pass in an implementation of the tool in the array passed to the
callLLMWithToolHandlingfunction (last parameter). Here, we get the expression from the LLM, as a string and use themathjslibrary to evaluate it. We return a string as a response for the LLM to use.
-
The
callLLMWithToolHandlingfunction will automatically handle tool calling if needed, and return the final response from the LLM. It will also capture the tool calls and store it a part of the JSON file generated for this LLM call. So here, we will have 3 nodes in the main graph (system message ->user message -> assistant message) and then when you click on the user message node, it will show a sub graph with the tool call node (if the LLM decided to use the tool), which will contain just the tool input (value ofexpression) and output (return value from theimplfunction). So 2 nodes in total. -
You can add multiple tools and tool implementations in a similar way.
-
The
shouldExecuteInParallelfunction controls whether multiple tool calls should run concurrently or sequentially within a single LLM response iteration. An iteration represents one complete response cycle from the LLM. For example:- Sequential tool calls (2 iterations): LLM calls toolA → receives result → calls toolB based on toolA's output
- Parallel tool calls (1 iteration): LLM calls both toolA and toolB simultaneously since they're independent
This function receives the current tool call details plus information about all other tool calls in the same iteration, allowing you to make dynamic decisions based on tool dependencies.
In this section, we will see how to add a tool that uses an LLMs, that also use the callLLMWithToolHandling wrapper function. We will take an example where the tool tells a story about a topic, and the main LLM call uses this tool when the user asks it for a story.
import { v4 } from 'uuid';
import OpenAI from "openai";
import { callLLMWithToolHandling, clearSessionId } from "@trythisapp/agentgraph";
import { ResponseFunctionToolCall } from "openai/resources/responses/responses";

let openaiClient = new OpenAI({
    apiKey: process.env['OPENAI_API_KEY'],
});

// this is the story getting agent (used as a tool for the main llm call)
async function generateStory(topic: string, toolId: string, sessionId: string) {
    let input: OpenAI.Responses.ResponseInput = [
        {role: "user", content: "Tell me a story about this topic: " + topic}
    ];
    let response = await callLLMWithToolHandling("story-teller", sessionId, toolId, async (inp) => {
        return await openaiClient.responses.create({
            model: "gpt-4.1",
            input: inp
        });
    }, input, []);
    return response.output_text;
}

// This is the main LLM call implementation.
const agentName = "my-agent"
const sessionId = v4(); // or it can be any other ID
try {
    let input: OpenAI.Responses.ResponseInput = [
        {role: "system", content: "You are a helpful assistant. If the user asks for a story, use the tellStory tool."},
        {role: "user", content: "Tell me a story."}
    ];

    let response = await callLLMWithToolHandling(agentName, sessionId, undefined, async (inp) => {
        return await openaiClient.responses.create({
            model: "gpt-4.1",
            input: inp,
            tools: [{
                type: "function",
                strict: true,
                name: "tellStory",
                description: "Use this tool when you need to tell a story. Example topic: \"A story about a cat\"",
                parameters: {
                    type: 'object',
                    properties: {
                        topic: {
                            type: 'string',
                            description: 'The topic of the story to tell.',
                        },
                    },
                    required: ['topic'],
                    additionalProperties: false
                },
            }]
        });
    }, input, [{
        toolName: "tellStory",
        impl: async ({ topic }: { topic: string }, toolId: string) => {
            return await generateStory(topic, toolId, sessionId);
        },
        convertErrorToString: (err: any) => {
            // In case the impl function throws an error, this function is called to convert the error to a string. You can return any string here, or just rethrow the error.
            // It is passed to the LLM as the response from the tool call.
            return err.message;
        },
        shouldExecuteInParallel: (input: { toolName: string; toolArgs: string; toolCallId: string; allToolCalls: ResponseFunctionToolCall[] }) => {
            // if there are multiple tool calls, this controls if we should run them in parallel or not. You can
            // return true / false dynamically based on the input and if the tools you create depend on each other or not (if they have shared
            // memory for example, then you may not want to run them in parallel).
            return true;
        },
    }]);

    console.log(response.output_text)
} finally {
    // this frees up the resources used by the sessionId
    clearSessionId(sessionId);
}- In this case, when the tool is called by the main LLM call, it will make another LLM call to generate its output. This is an example of a typical multi agent flow.
- When calling the tool, we pass in the
sessionIdandtoolIdto the tool function. This is very important, cause if not provided, the wrapper function will loose the context and will make an incorrect graph. - Also notice that we use different agent names. For the main LLM call, we use
my-agent. For the tool, we usestory-teller. The nodes in the graph will be named and coloured based on their agent name, so it will be easier to see when the flow changes from one agent to another. - The graph that will be generated will have 3 nodes in the main graph (system message -> user message -> assistant message) and then when you click on the user message node, it will show a sub graph with the tool call node (if the LLM decided to use the tool), which will contain nodes corresponding to the function call arguments -> user message -> assistant message -> final tool call output (what's returned from the
implfunction).
If your pipeline has multiple agent calls one by one, you can pass in the same sessionId for all of them to form one unified graph for the pipeline.
import { v4 } from 'uuid';
import OpenAI from "openai";
import { callLLMWithToolHandling, clearSessionId } from "@trythisapp/agentgraph";
import { ResponseFunctionToolCall } from "openai/resources/responses/responses";

let openaiClient = new OpenAI({
    apiKey: process.env['OPENAI_API_KEY'],
});

const sessionId = v4(); // or it can be any other ID
try {
    let input: OpenAI.Responses.ResponseInput = [
        {role: "user", content: "...."}
    ];

    let response1 = await callLLMWithToolHandling("my-agent1", sessionId, undefined, async (inp) => {
        return await openaiClient.responses.create({
            model: "gpt-4.1",
            input: inp,
            tools: [...]
        });
    }, input, [...]);

    let input2: OpenAI.Responses.ResponseInput = [
        {role: "user", content: "...."}
    ];

    let response2 = await callLLMWithToolHandling("my-agent2", sessionId, undefined, async (inp) => {
        return await openaiClient.responses.create({
            model: "gpt-4.1",
            input: inp,
            tools: [...]
        });
    }, input2, [...]);

    console.log(response1.output_text)
    console.log(response2.output_text)
} finally {
    // this frees up the resources used by the sessionId
    clearSessionId(sessionId);
}- In the above, we see two agent calls:
my-agent1andmy-agent2. We pas the samesessionIdto both of them, and this would result in the following graph: User message frommy-agent1-> assistant message frommy-agent1-> user message frommy-agent2-> assistant message frommy-agent2. - The node colours for
my-agent1andmy-agent2will be different, so it will be easier to see when the flow changes from one agent to another.
This is appropriate for production env:
import { v4 } from 'uuid';
import OpenAI from "openai";
import { callLLMWithToolHandling, clearSessionId } from "@trythisapp/agentgraph";

let openaiClient = new OpenAI({
    apiKey: process.env['OPENAI_API_KEY'],
});

const agentName = "my-agent"
const sessionId = v4(); // or it can be any other ID
try {
    let input: OpenAI.Responses.ResponseInput = [{role: "user", content: "Hello, how are you?"}];

    let response = await callLLMWithToolHandling(agentName, sessionId, undefined, async (inp) => {
        return await openaiClient.responses.create({
            model: "gpt-4.1",
            input: inp,
        });
    }, input, [], async (sessionId, node) => {
        // node is a JSON object containing the entire graph.

        // this is an example of how we can save the graph in a database that has two columns: sessionId (varchar(64)) and graph (jsonb).
        await prisma.agentgraph.upsert({
            where: { sessionId },
            update: { graph: node },
            create: { sessionId, graph: node }
        })
    });

    console.log(response.output_text)
} finally {
    // this frees up the resources used by the sessionId
    clearSessionId(sessionId);
}- In the above, we pass a callback to the
callLLMWithToolHandlingfunction. This callback is called each time there is a change in the graph. Thenodeinput contains the full graph (generated so far), so you can simply overwrite the existing row with the inputsessionIdto your database. - Also, please note that if you pass this callback to the
callLLMWithToolHandlingfunction, the wrapper function will not save the output JSON file to the file system. - Any errors thrown from the callback will be ignored.
- The library waits for the callback to finish, so in case you want to save the node in the background, you can remove the
awaitkeyword in your implementation of the function.
Coming soon...
Once you run your LLM flow like shown above, the wrapper function will generate a JSON file in the specified output directory. The name of the file will be the ${sessionId}.json file. Now you need to:
-
Clone this repo.
git clone https://github.com/rishabhpoddar/agentgraph.git
-
Install the visualizer:
cd agentgraph/visualizer pip install -r requirements.txt -
Run the visualizer:
python main.py <path-to-the-json-file>
For example, if the json file is called
123.json, then you runpython main.py 123.json. -
The above command will generate a
llm_graph.htmlin thevisualizerdirectory. Open this file in your browser to see the graph.